Software Updates — Week of September 1, 2026
Hello everyone! Lot's of updates this week across a majority of our modules.
We're also working harder to make sure you get to take advantage of everything in the system. Seamus (shay-mus in case you're wondering ;-) has been working on all the little items that make the system easier to use, like help files and guides. In August he also started reaching out to those of you who haven't turned on accepting new license applications so we can help you get that turned on. He'll touch base with more of you in the coming weeks!
Here's what's new this week in GovPossible:
Inspections: Portal Users may request an alternate point of contact
Scheduling an inspection is rarely a solo effort. The person logging into the portal isn't always the one who will meet the inspector on site — it might be a subcontractor, a site superintendent, or the property owner. Until now, this had to be included in the inspection details..
The inspection request form now includes an "I'm the inspection contact" checkbox, checked by default. For most requests, that's all you need to do — your name and email carry straight through to the inspection, and the form will prompt you to fill in anything missing from your profile. Better still, whatever you enter is saved back to your profile, so you only have to provide it once.
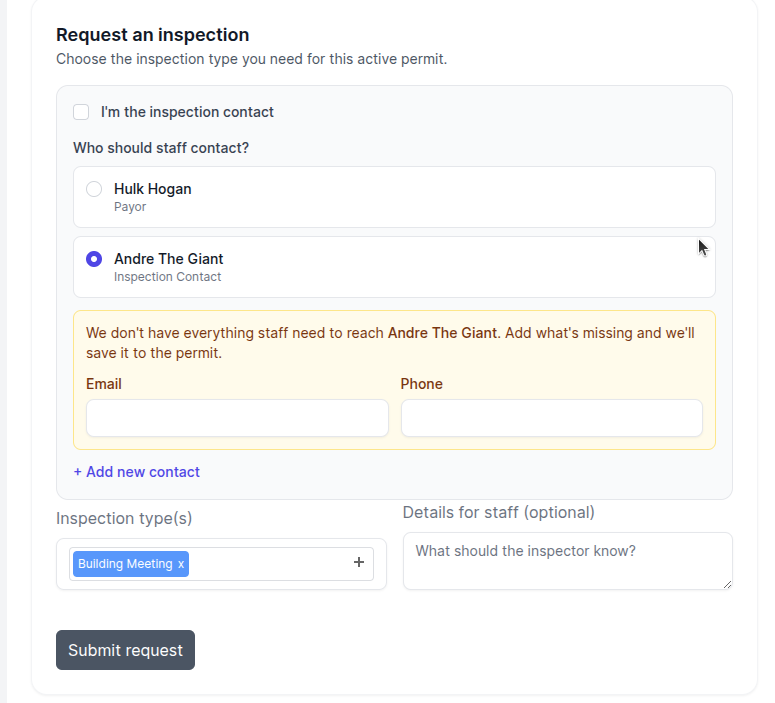
When someone else should be the contact, they simply un-check the box. The form then shows everyone already associated with the permit, so they can pick the right person in a single click. If the person you need isn't on that list yet, an Add new contact button lets them enter their details.
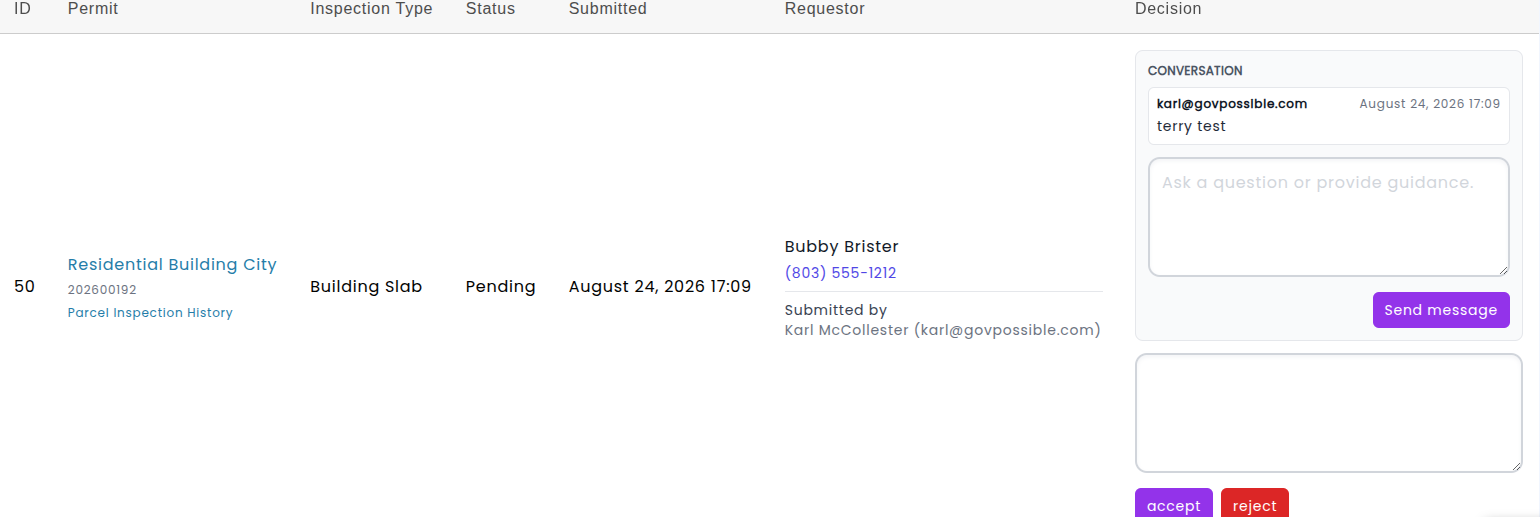
For your staff, this means inspection requests arrive with contact details attached from the start.
Planning: Case Status
Planning cases now carry a status. It appears as a badge right beside the case number and address at the top of the page, so anyone looking at a case can tell whether it is under review, approved, complete, or wherever else it sits in your community's process. New cases start at the first step of the workflow automatically, so there is nothing extra to set when a case is created.
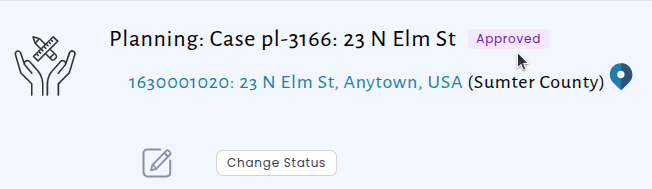
Moving a case forward is now a single, consistent step. The new Change Status button opens a small popup where you pick the new status from a list and, if you'd like, add a short note explaining why the status is changing. The list offers the statuses your jurisdiction has defined for that type of case.
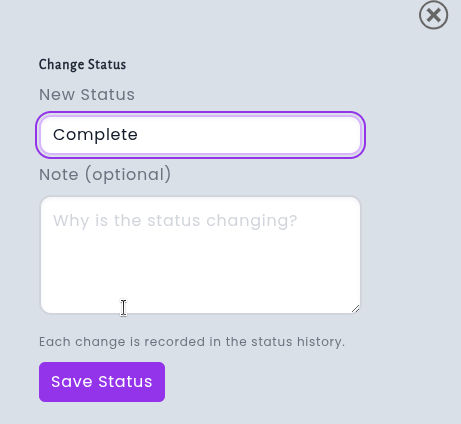
Every status change is records — what the status was before, what it changed to, who made the change, when it happened, and any note that was entered. That history is displayed as a timeline on the case itself, so the full story of a case is right there when an applicant calls to ask where things stand, when a colleague picks up a case mid-review, or when you need to demonstrate how a decision progressed.
Codes Enforcement: Cases Spreadsheet Export
You can now export your Codes Enforcement case list to a CSV file with a single click. Look for the new Export to CSV button in the action row at the top of the case index, right alongside your filters. The file opens directly in Excel, Google Sheets, or any spreadsheet program you already use.
Smaller exports download immediately. For larger lists, we generate the file in the background and email you a download link when it's ready, so your browser never stalls waiting on a big report. This makes it much easier to pull monthly enforcement numbers for a council packet, hand a violation list to another department, track remediation deadlines across a neighborhood, or simply keep an offline record — without asking anyone to retype a thing.
Planning: Cases Can Now Have Subcases
Planning cases can now be linked together as parent cases and subcases — the same relationship that permit applications. When a project spawns related reviews, you no longer have to track the connection in a description field or in your head. A case page now shows a Parent Case section when it belongs to a larger project, along with lists of its Subcases and Related Cases, so anyone opening the file can see the whole family at a glance. The case list shows the same connection with a "Subcase of" badge next to any case that belongs to a parent.
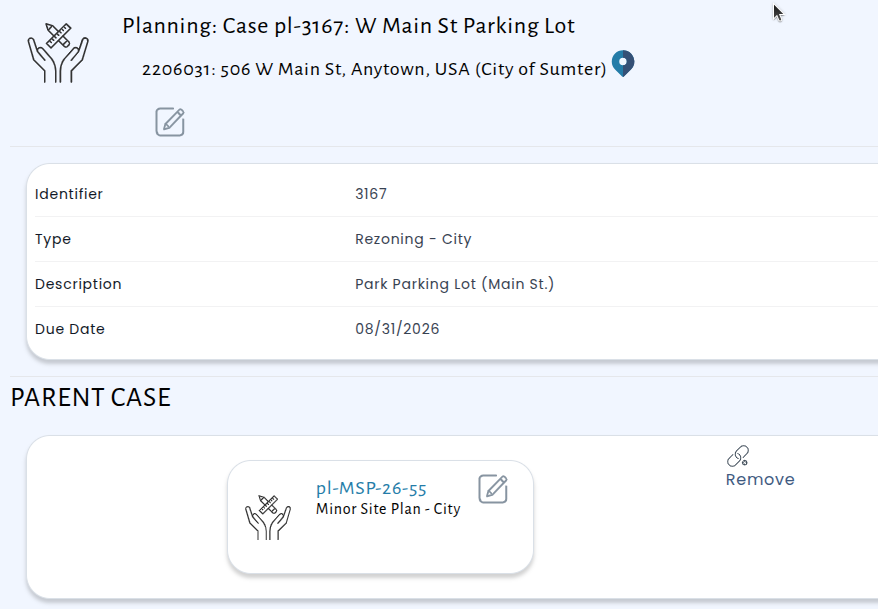
Creating a subcase is a single click from the parent case. The Add Subcase button opens a new case form already filled in with the parent's description, case data, and parcels — you just choose the case type for the new case. Once the subcase is created, the parent's contacts and any linked permits are carried over automatically, so you're not re-entering the same applicant, property owner, and permit references for the third time. You can also link two cases that already exist: search for the case by its identifier from the Parent Case section, and unlink it just as easily with the Remove control.
Conditions now roll up across the whole family. Open a parent case and you'll see the conditions from its subcases alongside its own; open a subcase and you'll see the full picture from across the project. That means a condition attached to one piece of a multi-part application won't get missed when staff are reviewing a different piece of it. To keep things clear, the relationship stays one level deep — a subcase can't have subcases of its own.
Finance: AP Check Register Report
This report grew directly out of a customer request. Finance and Auditor users will find a new report in the reports menu: the AP Check Register. It lists every accounts payable disbursement your organization made over a date range you choose — checks, EFTs, and card payments together — with the vendor, what the payment was for, the invoice number, the expense account, the bank account it came out of, and the amount. Each run shows a count and a grand total at the top, so you can see at a glance how much went out the door in a given period.
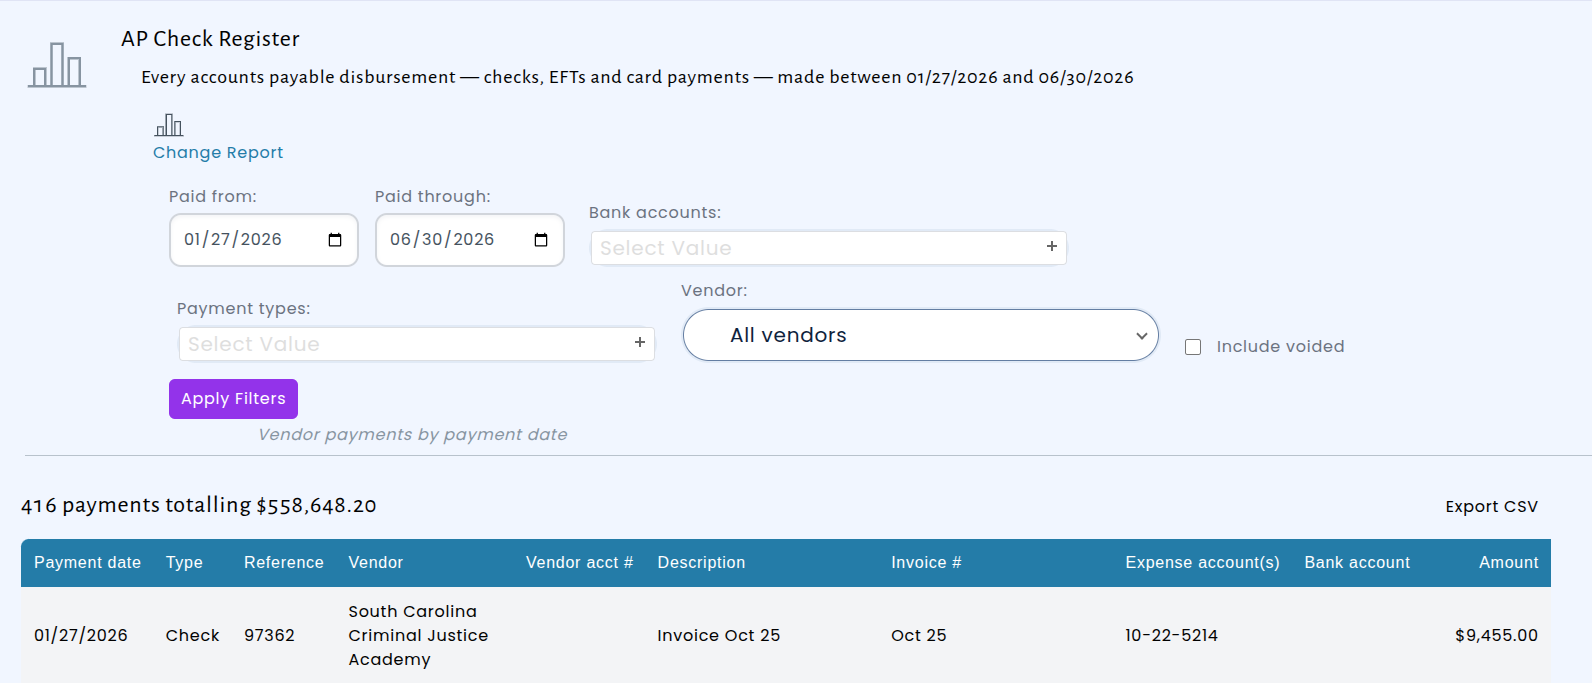
The register opens on the current month and narrows from there. You can set any date range, limit the results to one or more bank accounts, focus on a single vendor, or show only one payment type. Voided payments are hidden by default and left out of the total; a checkbox brings them back into view, clearly marked, when you need the complete picture. Only payments that have actually been paid appear — drafts and scheduled payments stay out, so the report always reflects money that truly left the bank.
Permitting: Temporary Certificates of Occupancy Customizable To Local Rules
Temporary Certificates of Occupancy (TCOs) are one of those documents where the wording really matters — and until now, the timeframe printed on every TCO was fixed at 90 days. If your jurisdiction grants a different window, or if your building official words the condition differently than the standard language, staff had to work around the form. That's no longer the case.
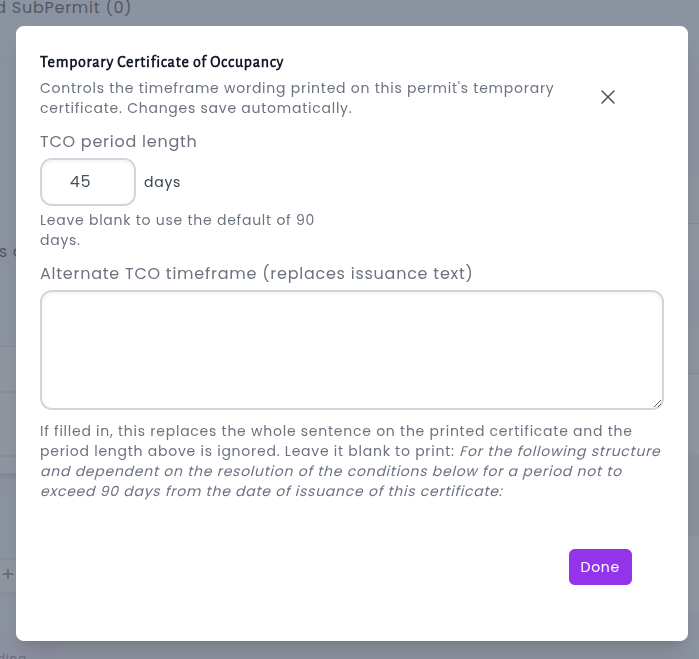
Under Application Data in your permitting settings, you'll find a new box for Temporary Certificate of Occupancy options. The first field lets you set the TCO period length in days — enter whatever number your ordinance calls for, and that value flows straight into the printed certificate. Leave it blank and it quietly falls back to the familiar 90 days, so nothing changes unless you want it to. The second field, Alternate TCO Timeframe, is there for the cases where a number alone isn't enough: type in your own sentence and it replaces the standard "for a period not to exceed __ days from the date of issuance of this certificate" language entirely. Both fields save automatically as you type, so there's no separate save step to remember.
The result is that your temporary certificates read the way your community expects them to, without anyone having to edit a document by hand after it prints. Both the commercial and residential TCO forms pick up whichever wording you've configured, so the two stay consistent with each other and with your local code. Set it once, and every TCO issued from that point forward carries the right timeframe.
Miscellaneous Charges: Online Payment
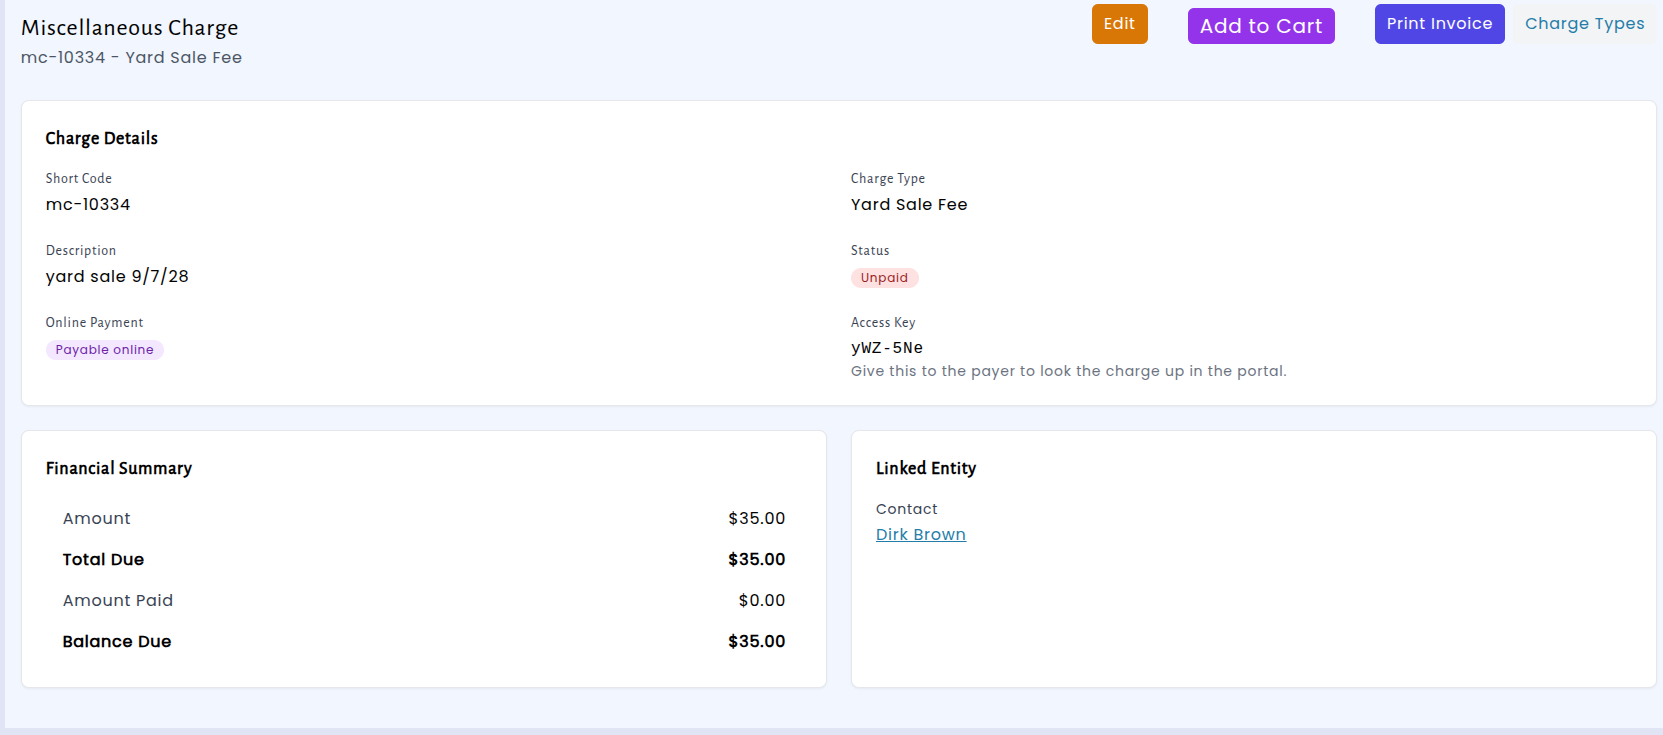
Miscellaneous charges — the one-off invoices your staff bills for things like equipment rental, damage reimbursements, permits, and special services — can now be paid online through the resident portal. Previously, these charges lived only in the office: staff created them, mailed or handed out a statement, and then waited for a check to arrive. Now every miscellaneous charge you create is issued with its own secure access key, which means the person who owes it can look it up and pay it from home, on their phone, at any hour.
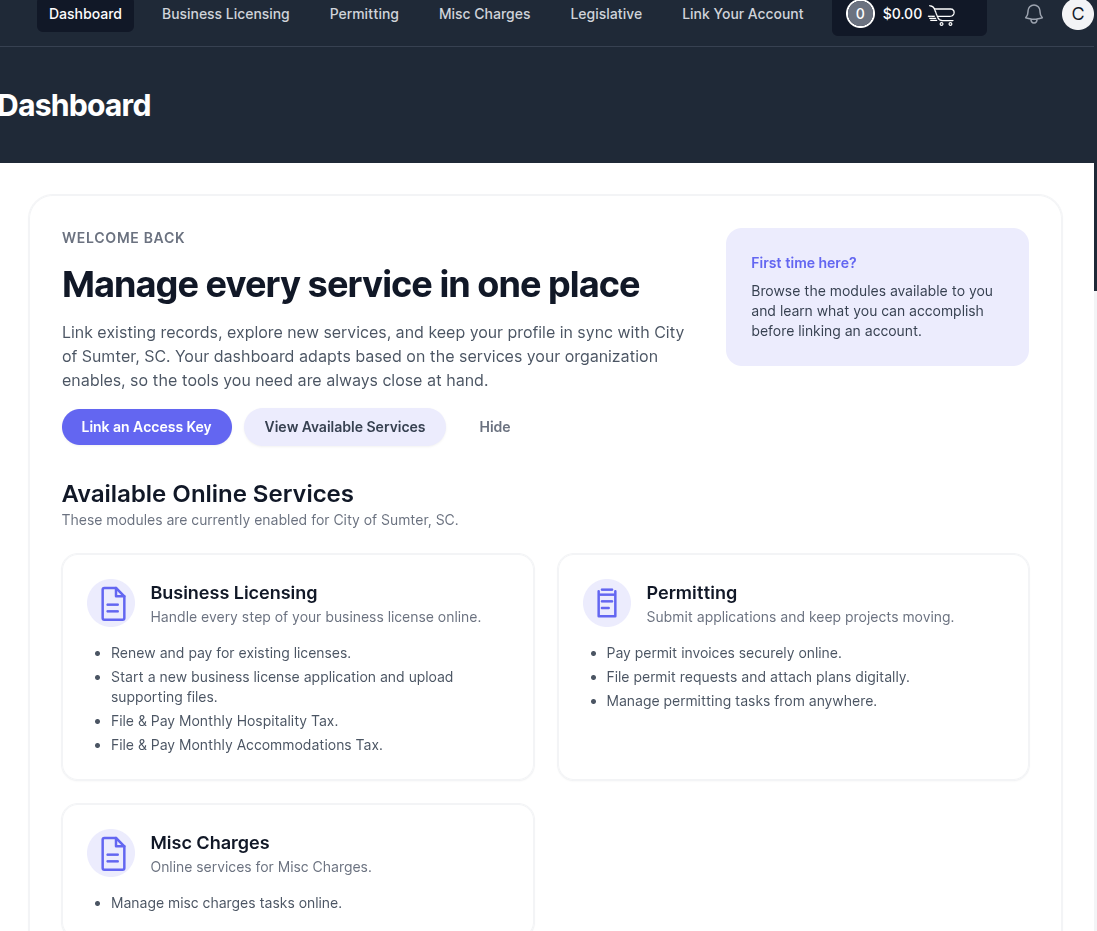
Each community controls whether this is turned on. In addition, each misc charge gives you control regarding whether to make it available online for payment:
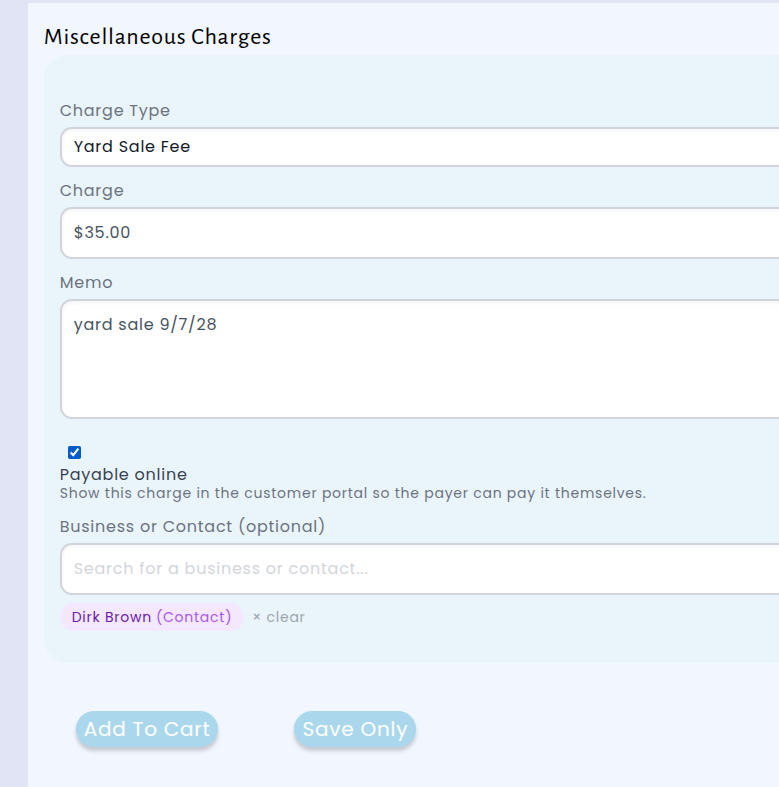
On the resident side, the portal now has a dedicated Miscellaneous Charges section. When a charge is tied to a person or business that already has an online account — matched automatically by email address — it simply appears in their account alongside their other bills, with no access key to type in and nothing for your staff to send. Residents who don't have an account can still pay by entering the access key printed on their statement.
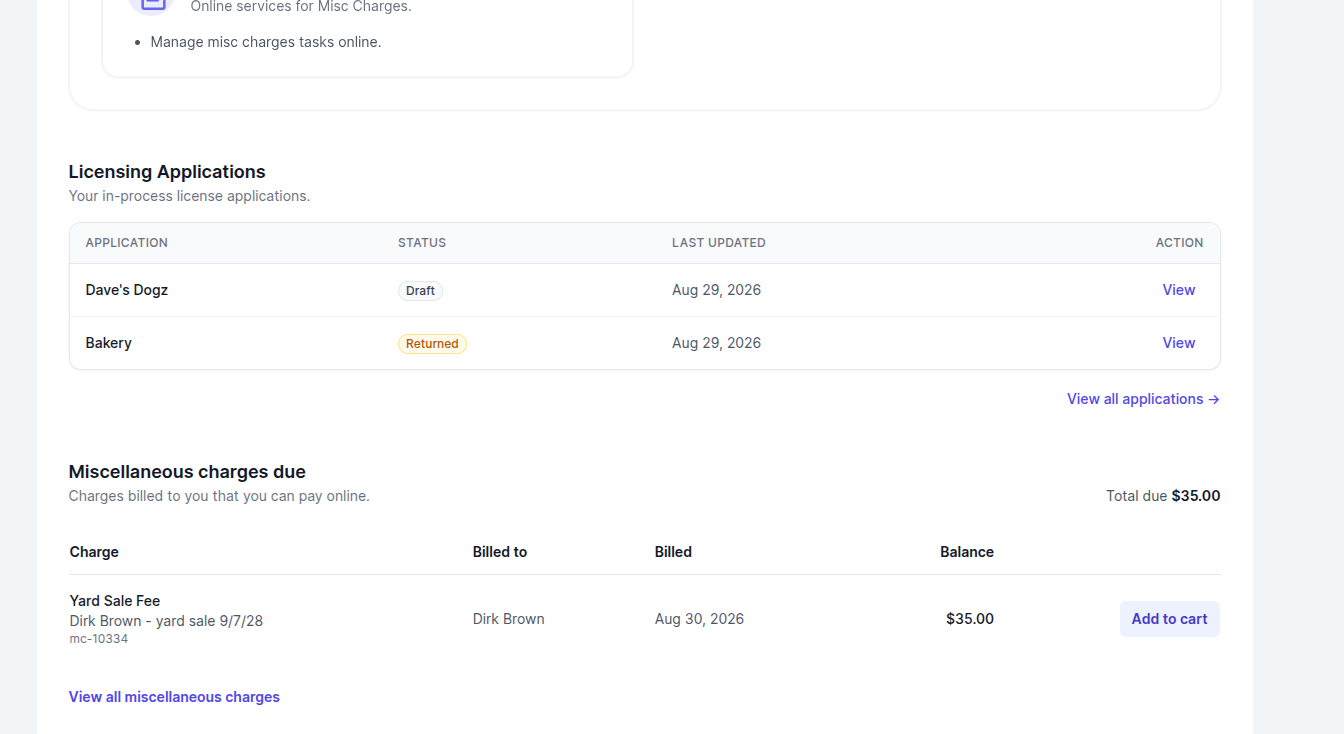
From there, a miscellaneous charge behaves like everything else in the portal: the resident adds it to their cart and checks out, paying several items together in a single transaction if they'd like.
Licensing: Business-Level Fields
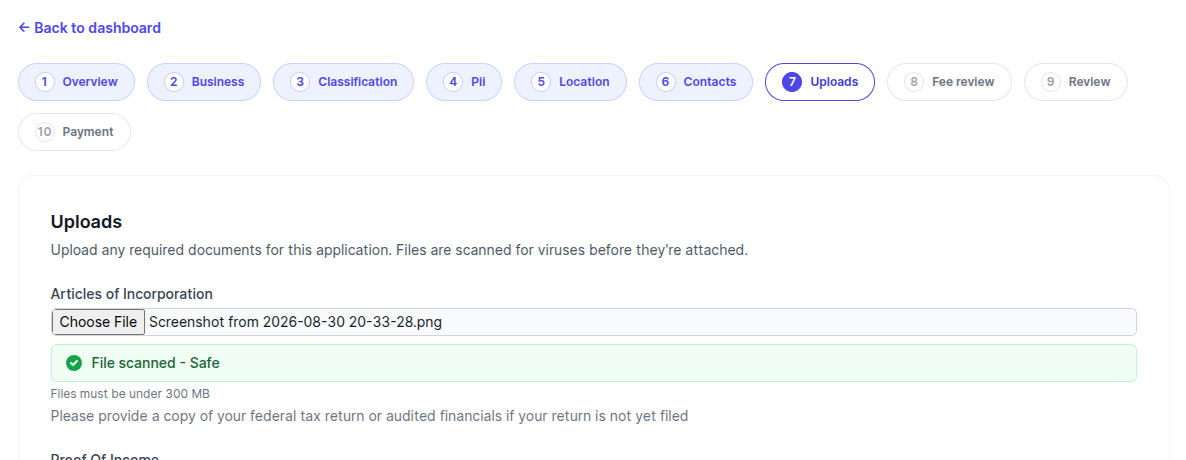
Now that we've had custom input fields for license applications for a while, we noticed a challenge: if you wanted to require things like the articles of incoporation for users online, they were tracked with the license application, which means you'd have to look back at the first application whenever you wanted to see that information. We've now added the ability to add a field to the process that ties directly to the business instead.
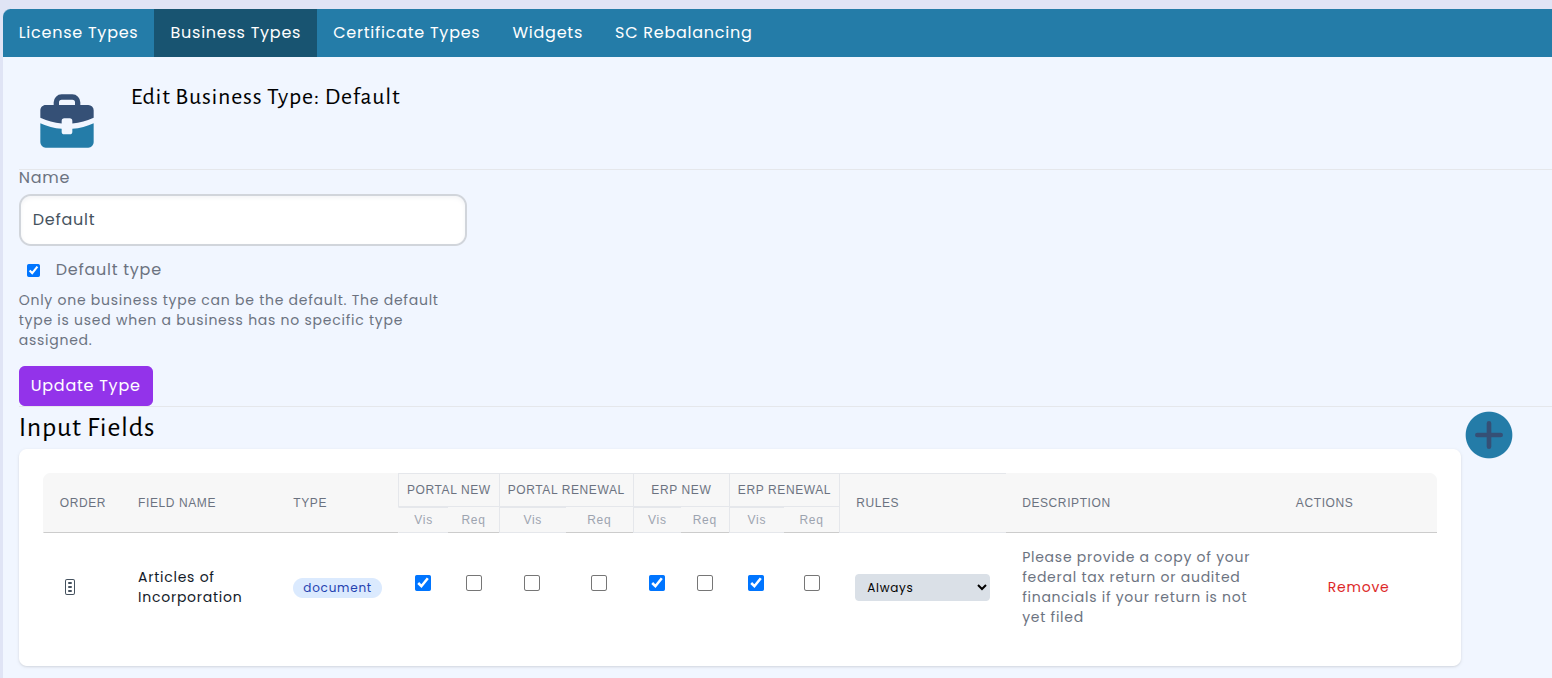
Those fields flow straight through to the community portal, so applicants see them while they're filling out a new business license application. Fields appear in the appropriate step of the application wizard alongside the standard business details, and any documents you've requested show up on the Uploads step with your instructions right underneath. Uploaded files are automatically scanned for viruses before they're attached, and the applicant sees a clear confirmation once a file is cleared.
Interactions Now Searchable
Recorded interactions — phone calls, emails, letters, text messages, and in‑person visits — used to be viewable only one record at a time. Now every recorded interaction is fully searchable, and you can get to it the same way you search for anything else in the system: just start typing in the search bar at the top of the page.
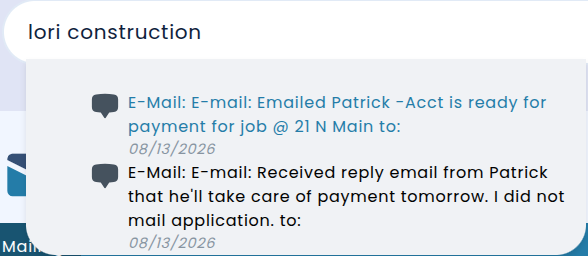
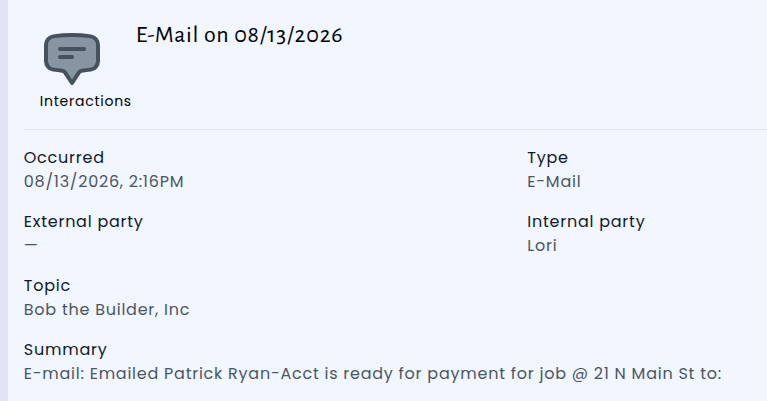
The search looks at the words you'd actually remember — the subject line, the body of the note, who was on the call or in the meeting, phone numbers, and the names of both the outside party and the staff member who logged it. That means a search for a person's name will turn up their interaction whether they're the linked contact, mentioned only in the body of a note, or simply listed among the attendees. Selecting a result opens the full interaction so you can see exactly what was said, when it happened, who handled it, and what it was about.
Licensing: A Second Set of Renewal and Delinquency Notices — Just for Businesses You Can't Email
Now that renewal and delinquency notices can be sent by email, printing a letter for every license holder means a lot of wasted paper and postage. Business Licensing now prepares a second printable notice file alongside the existing one: a "No Email" version containing only the businesses that won't receive an email. Both files are built automatically overnight, so when you arrive in the morning, the complete mailing and the mail-only mailing are each ready to download and print.
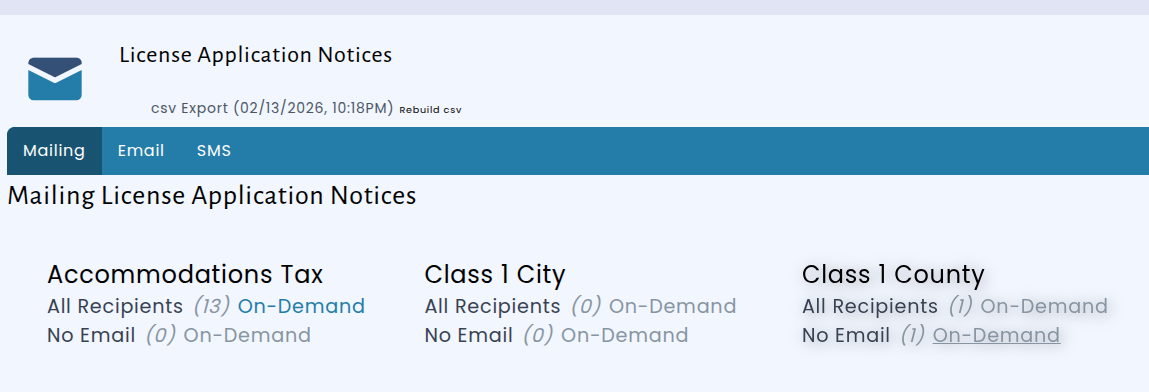
You'll see the new option on both the renewal notices screen and the delinquent notices screen, with a live count next to it so you know exactly how many letters you're about to print before you print them. The original all-recipients file hasn't changed and is still there whenever you want to mail everyone — the No Email file is simply a second choice.