This week: Slope Prep and Planting Tips
Hello!
Let’s close out the slope series by addressing some tactical challenges you might encounter: site prep and mulching. (Good news! If you’re tired of all this slope talk, regular programming resumes next week.)
Site Preparation for Slopes
Let’s start with site prep. In flatter areas, I typically recommend sheet mulching to kill grass and suppress weeds. However, a layer of cardboard only causes the slope to become more slippery, and any mulch you layer on top of cardboard won’t stay in place. If your site is grass-covered or excessively weedy, consider solarization or occultation instead. Solarizing is covering the area with thick, clear plastic for a few weeks or longer during the hottest, sunniest part of summer. Occultation is a similar process using black plastic instead, but it takes longer to work. If you’re using black plastic, you’ll apply it in the late winter or early spring and leave it on until the fall, or even the following spring. The plastic will kill what lies beneath.
Now, let’s say you have bare soil with some weeds and a handful of established plants that you don’t intend to move. Covering everything with plastic is out, and you will likely have to remove weeds by hand. This can be tricky. When you disturb the soil by pulling weeds, you stir up the seed bank and also make a nice, fresh spot for weed seeds to land. If you aren’t planting immediately, cover the freshly weeded area with cardboard (weighted down with bricks or landscape pins and soaked with water). This will block the sun, protect the area from seed dispersal, and reduce soil erosion. Remove the cardboard when you’re ready to plant.
Mulching Slopes
Once you have a freshly weeded slope or you’ve pulled up all the plastic and have a clean slate, it is time to mulch. If your slope isn’t too steep, use wood mulch. The finer it is, the better it adheres (so, skip the bark mulch). Or, pile on the leaves, pine needles, or chopped-up garden waste. Because some of the mulch will slide, be liberal at the top and stingy toward the bottom. Installing perennials every 12-18 inches in a zigzag pattern will help keep the mulch from traveling too far.
What if you used plastic, and when you pulled it back, there was a bunch of dead thatch? Good news! That’s free mulch! Plant directly in it. Any additional mulching is your choice.
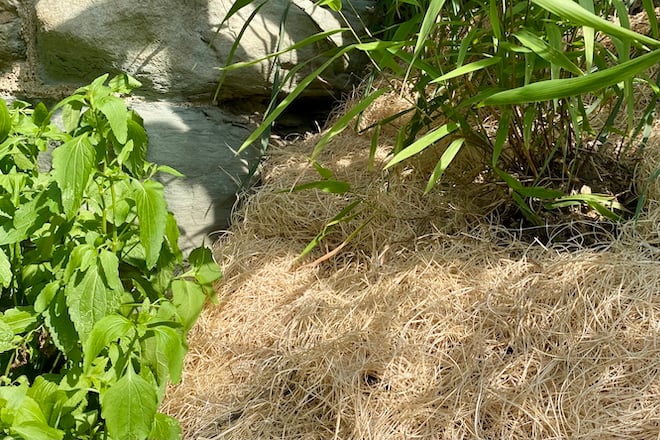
Now, let’s say you have a steeper slope, and mulch won’t stick. Consider a straw seed germination blanket. The straw is woven together with biodegradable plastic netting that breaks down after a season or two (or you can pull the netting away after it loosens). If you don’t love the idea of plastic netting, consider using rolled burlap from the farm supply store. It breaks down after a season and can be lightly covered with mulch if you find it unsightly. You’ll affix the straw blanket or burlap to the slope with landscape pins, and punch holes to install your plants.
By mulching, you’ll keep the soil in place and reduce weed pressure. Once the plants are established (or the shrubs have matured), any additional mulching will depend upon your aesthetic.
Elsewhere:
Are you a rock garden fan? Take things up a notch with crevice gardening. Learn more in this article from Penn State Extension.
Have a great week,
Julie