Behind the PowerShell Pipeline logo

Behind the PowerShell Pipeline

Subscribe
Archives
July 8, 2025

Creating HTML Reports with PowerShell Part 2

Last time, we kicked off our journey into HTML reporting with PowerShell, exploring the basics of creating HTML content, primarily using ConvertTo-Html. What I've shown you thus far is probably enough if you only need to the output from a single command. For more complex reports, I think you will want to take advantage of HTML fragments. We'll also look at other reporting features you might want to take advantage of.

I am using PowerShell 7 for my examples. The ConvertTo-Html cmdlet in PowerShell 7 has a few more features than the one in Windows PowerShell, so if you are still using Windows PowerShell, you will have to adjust the examples slightly.

Using Fragments

I have always found fragments feature of ConvertTo-Html to be incredibly useful. Using fragments I can create an HTML document with a mix of tables and lists. Although, I should point out that if you prefer a list, you can use the -As parameter with ConvertTo-Html to create a list from any object.

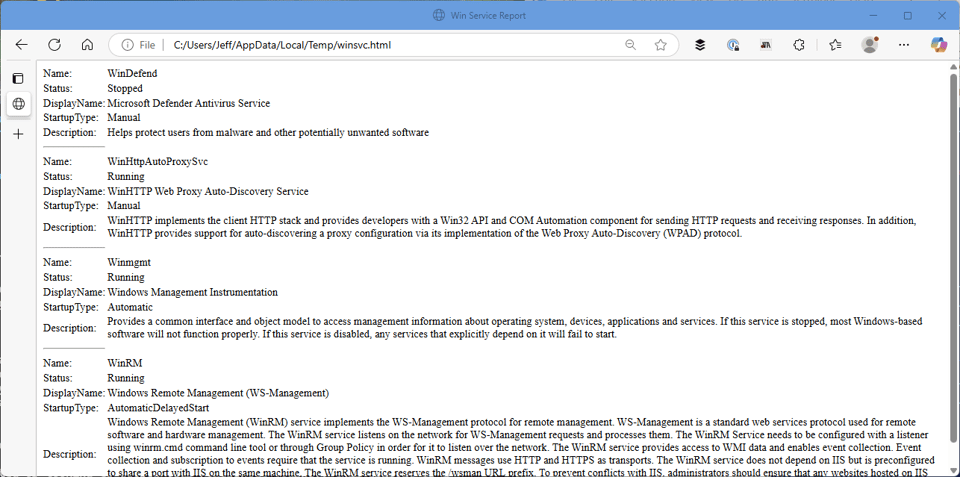
$file = Join-Path -path $env:temp -childpath "winsvc.html"
Get-Service win* | Select-Object Name,Status,DisplayName,StartUpType,Description |
ConvertTo-Html -title "Win Service Report" -As List | Out-File -filepath $file
Creating List Output
figure 1

The -Fragment parameter is a separate feature. Instead of creating a complete HTML document, it creates a fragment that can be inserted into an existing HTML document. The default format is a table, but you can use -As to change the format to a list.

I often build reports and use fragments to insert headings. Create an array or generic list to hold the fragments. Add each fragment to the list or array, and use the fragments as the body.

$Computername = $env:COMPUTERNAME
$cimParam = @{
    OutVariable = 'c'
    ComputerName = $Computername
    ClassName = "Win32_OperatingSystem"
}
$fragments = @()

#save the operating system name
$os = Get-CimInstance @cimParam -Property Caption

#ComputerSystem
$cimParam.ClassName = 'Win32_ComputerSystem'
$cs = Get-CimInstance @cimParam |
Select-Object Manufacturer, Model, SystemFamily, SystemSKUNumber, SystemType, NumberOf*, TotalPhysicalMemory
#capture the computername from the CimInstance
$computerName = $c.CimSystemProperties.ServerName

#split the class name and use the second part as the heading,
#e.g. Win32_ComputerSystem becomes ComputerSystem
$fragments += "<h3>$($c.CimClass.CimClassName.split('_')[1])</h3>"
$fragments += $cs | ConvertTo-Html -Fragment -As List

#volumes
$cimParam.ClassName = 'Win32_Volume'
$vol = Get-CimInstance @cimParam -filter "DriveType=3" |
Select-Object Name, Label, FreeSpace, Capacity
$fragments += "<h3>$($c.CimClass.CimClassName.split('_')[1])</h3>"
$fragments += $vol | ConvertTo-Html -Fragment -As Table

#processor
$cimParam.ClassName = 'Win32_Processor'
$cpu = Get-CimInstance @cimParam |
Select-Object DeviceID, Name, Caption, MaxClockSpeed, *CacheSize, NumberOf*, SocketDesignation, *Width, Manufacturer
$fragments += "<h3>$($c.CimClass.CimClassName.split('_')[1])</h3>"
$fragments += $cpu | ConvertTo-Html -Fragment -As List

#memory
$cimParam.ClassName = 'Win32_PhysicalMemory'
$mem = Get-CimInstance @cimParam | Select-Object BankLabel, Capacity, DataWidth, Speed
$fragments += "<h3>$($c.CimClass.CimClassName.split('_')[1])</h3>"
$fragments += $mem | ConvertTo-Html -Fragment -As Table

$title = "System Configuration Report"

#embedding the CSS
#preContent is out of order when using fragments so I'll move it to the head
$head = @"
<Title>$title</Title>
<style>
body { background-color:#FFFFFF;
     font-family:Tahoma;
     font-size:12pt; }
td, th { border:1px solid black;
     border-collapse:collapse; }
th { color:white;
     background-color:black; }
table, tr, td, th { padding: 2px; margin: 0px }
tr:nth-child(odd) {background-color: LightGray}
table { width:95%;margin-left:5px; margin-bottom:20px;}
</style>
<h1>$Title</h1>
<h2>$computerName | $($os.caption)</h2>
"@

$post = "<h5><i>Report run $(Get-Date)</i></h5>"
$splat = @{
    PostContent = $post
    Head        = $head
    Body        = $Fragments
}

$report = Join-Path -Path $env:temp -ChildPath "SystemReport-$Computername.html"
ConvertTo-Html @splat | Out-File $report

I am creating HTML fragments for each CIM class I query. I add a heading for each fragment, and then I add the fragment to the array. At the end of the script, I use ConvertTo-Html to create the HTML document using the fragments as the body.

System Report from fragments
figure 2

Images

A common reporting feature you will likely want to include is images. You may have a company logo, or maybe a graph or chart you've generated. You'll need to use the <img> tag. At a minimum, you need to specify the src attribute, which is the path to the image file. Again, you need to consider how the file will be consumed or viewed.

<img src='c:/scripts/server-rack.jpg'>

A source like this only makes sense if I am viewing the report on the same computer where the image is stored. Here is a code sample you can try. Replace the image path with a valid path on your computer. This code is also scaling down the image to 25% of its original size. That is completely optional.

$title = "Win Service Report"
$pre = @"
<h1>Win* Service Report</h1>
<h2>$($env:Computername)</h2>
<img src='c:/scripts/server-rack.jpg' width='25%' height='25%'>
"@
$post = "<h5><i>Report run $(Get-Date)</i></h5>"
$head = @"
<Title>$title</Title>
<style>
body { background-color:#FFFFFF;
     font-family:Tahoma;
     font-size:10pt; }
td, th { border:1px solid black;
     border-collapse:collapse; }
th { color:white;
     background-color:black; }
table, tr, td, th { padding: 2px; margin: 0px }
tr:nth-child(odd) {background-color: LightGray}
table { width:95%;margin-left:5px; margin-bottom:20px;}
</style>
"@
$splat = @{
    PreContent  = $pre
    PostContent = $post
    Title       = 'Win Service Report'
    Head        = $head
}
Get-Service win* |
Select-Object Name,Status,DisplayName,StartUpType,Description |
ConvertTo-Html @splat |
Out-File -filepath $file
Inserted Image
figure 3

I find a more useful approach is to embed the image in the HTML document. This makes the report self-contained. However this will increase the file size of the final HTML document. You will need to convert the image to a Base64 string and then use that string as the src attribute.

Here is a helper function that will read an image file and return a Base64 string.

Function encodeImage {
    [cmdletbinding()]
    Param(
        [Parameter(Mandatory,HelpMessage="Path to the image file")]
        [ValidateScript({Test-Path $_})]
        [ValidatePattern("^(.*\.(jpg|jpeg|png|gif|bmp))$")]
        [string]$imagePath
    )

    if ($PSVersionTable.PSVersion.Major -eq 7) {
        $imgBytes = Get-Content $ImagePath -AsByteStream
    }
    else {
        $imgBytes = Get-Content $ImagePath -Encoding Byte
    }

    $ImageBits = [Convert]::ToBase64String($imgBytes)
    $ImageFile = Get-Item $ImagePath
    $ImageType = $ImageFile.Extension.Substring(1)

    [PSCustomObject]@{
        ImageBits = $ImageBits
        ImageFile = $ImageFile
        ImageType = $ImageType
    }
}

Here's the same code as before, except I'm embedding the image and adding a little formatting.

$img = encodeImage C:\scripts\server-rack.jpg
$title = "Win Service Report"
$pre = @"
<h1>Win* Service Report</h1>
<h2>$($env:Computername)</h2>
<Img src='data:image/$($img.ImageType);base64,$($img.ImageBits)' Alt='$($img.ImageFile.Name)' title ='$($img.ImageFile.Name)' style='float:left' width='25%' height='25%' hspace=10>
"@
...

The report looks the same, but now the image is embedded in the HTML document. This means I can send the report to someone else, and they will see the image without needing access to the original file. However, this increased the file size from 3KB to over 2MB. I could mitigate this by using a smaller image or adjusting the image quality and resolution before embedding it.

The file I am using is a 1.6MB file at a resolution of 2560x1920. I used the Image Resizer from Microsoft PowerToys to reduce it to a small file. Using this images reduced the final HTML file size to 98KB. The point is to watch the file size of the images you embed. If you are embedding multiple images, you may want to consider using a smaller image or reducing the resolution.

Adding Metadata

One last item before we wrap up for today. You might want to include some metadata in your HTML report. This is information about the report itself, such as when it is was created, who created it, and any other relevant details. This can be especially useful if you are generating reports as a scheduled process.

I was once presenting on HTML reporting to a user group. One of the attendees mentioned that someone, years ago, had setup a process to generate and email HTML reports. However, no one know where the reports were coming from. Whoever set this up was no longer with the company, and the process was not documented. Ever since hearing this story I always include metadata as a footer in my reports.

The ConvertTo-Html cmdlet has a -Meta parameters, but this is for inserting HTML metadata into the document using <meta> tags. This is a different type of metadata, although there is the possibility of some overlap.

Here's a code sample that adds metadata to the report. I am using the PostContent parameter to add a footer with the metadata.

#requires -version 7.5

$imgPath = 'c:\scripts\gazoo.bmp'
#embed the image
$img = encodeImage $imgPath
$reportVersion = '1.2.0'
$file = Join-Path $env:TEMP -ChildPath 'WinServiceReport1.html'
$title = 'Win Service Report'
$pre = @"
<h1>Win* Service Report</h1>
<h2>$($env:Computername)</h2>
<Img src='data:image/$($img.ImageType);base64,$($img.ImageBits)' Alt='$($img.ImageFile.Name)' style='float:left' width='15%' height='15%' hspace=10>
"@

$head = @"
<Title>$title</Title>
<style>
body { background-color:#FFFFFF;
     font-family:Tahoma;
     font-size:10pt; }
td, th { border:1px solid black;
     border-collapse:collapse; }
th { color:white;
     background-color:black; }
table, tr, td, th { padding: 2px; margin: 0px }
tr:nth-child(odd) {background-color: LightGray}
table { width:95%;margin-left:5px; margin-bottom:20px;}
.footer {
    margin-left: 25px;
    font-family: Tahoma;
    font-size: 10pt;
    font-style: italic;
}

</style>
"@

#metadata about the script that generated the report
$scriptSrc = (Convert-Path $MyInvocation.InvocationName).Replace('\', '/')
$postmeta = @"
<div class='footer'>
<b>Report Date</b>   : $(Get-Date -Format U) UTC<br>
<b>Report Run</b>    : $($env:USERDOMAIN)\$($env:USERNAME)><br>
<b>Script</b>        : $scriptSrc <br>
<b>ScriptVersion</b> : $reportVersion<br>
<b>Source</b>        : $env:COMPUTERNAME<br>
</div>
"@

#insert html document metadata
# Accepted meta properties are content-type, default-style, application-name, author, description, generator, keywords, x-ua-compatible, and viewport
$meta = @{
    Author        = "$($env:USERDOMAIN)\$($env:USERNAME)"
    Description   = "Report generated by {0} from {1} at {2} UTC. Report {3} version {4}" -f "$env:USERDOMAIN\$env:UserName", $env:COMPUTERNAME, (Get-Date -Format U),$scriptSrc,$reportVersion
    keywords = "powershell,service"
}

$splat = @{
    PreContent  = $pre
    PostContent = $postMeta
    Title       = 'Win Service Report'
    Head        = $head
    Meta        = $meta
}

Get-Service win* |
Select-Object Name, Status, DisplayName, StartUpType, Description |
ConvertTo-Html @splat | Out-File -FilePath $file

In my script I am creating a footer with script metadata.

$scriptSrc = (Convert-Path $MyInvocation.InvocationName).Replace('\', '/')
$postmeta = @"
<div class='footer'>
<b>Report Date</b>   : $(Get-Date -Format U) UTC<br>
<b>Report Run</b>    : $($env:USERDOMAIN)\$($env:USERNAME)><br>
<b>Script</b>        : $scriptSrc <br>
<b>ScriptVersion</b> : $reportVersion<br>
<b>Source</b>        : $env:COMPUTERNAME<br>
</div>
"@

I am also inserting a custom style class. You can see the .footer style in the header.

Script metadata
figure 4

Now I can tell what code created the report and where it came from. I've also inserted this information into the HTML metadata.

Using HTML meta tags
figure 5

Summary

This should give you plenty of information and examples to begin creating your own HTML reports. I have shown you how to use fragments to create more complex reports, how to embed images, and how to add metadata to your reports. These features will help you create more informative and useful reports.

Next time, I'll show you a few alternatives for creating HTML reports that you might find easier to use.

(c) 2022-2025 JDH Information Technology Solutions, Inc. - all rights reserved
Don't miss what's next. Subscribe to Behind the PowerShell Pipeline:
Start the conversation:
GitHub Bluesky LinkedIn About Jeff
Powered by Buttondown, the easiest way to start and grow your newsletter.