Behind the PowerShell Pipeline logo

Behind the PowerShell Pipeline

Subscribe
Archives
July 1, 2025

Creating HTML Reports with PowerShell

I had planned on presenting at WorkPlace Ninjas UK last month in Scotland. Sadly, my travel plans fell apart and I was unable to attend. I had prepared a presentation on creating HTML reports with PowerShell. I see no reason to let that content go to waste, so let's go through it here.

I expect more than a few of you have created HTML files that document different aspects of your environment. Or maybe you've wanted to. HTML files give you options. You can post them to web server, view them locally in your browser, or even email them. Modern email contents can render HTML so you could send a periodic report to your team or management that originates from a PowerShell prompt. I have a few scripts that run daily that email me HTML reports. The email client render the HTML giving me a rich experience.

Planning PowerShell Reporting

Before you get to writing a single line of code, I recommend you take a few minutes to plan out your reporting needs. This will help you avoid the trap of writing code that doesn't meet your needs and keep you focused.

Here are some questions to consider:

  • How will your reports be generated?
    • Will you create them manually?
    • Maybe you will use a scheduled task or a third-party scheduling tool.
    • What version of PowerShell will you use?
  • What data will the reports contain?
    • What specific bits of information are essential?
    • What information would be nice to have?
    • How can you get that data?
    • What credentials will you need to access the data?
    • Is any of the report content sensitive or confidential?
  • Where will the reports be stored?
    • Do you need to retain them for a period of time?
    • What about access control?
  • How will they be consumed?
    • Who will consume them?
    • Will they be mailed or viewed in a browser?
    • Maybe you have an application to presents HTML data.

If you can generate objects in PowerShell, you can create HTML reports. What they look like and what you do with them is up to you.

The Basics

When creating HTML reports with PowerShell, keep these basics in mind:

Know your data

My assumption is that you will be using PowerShell to gather information and data for your reports. For the best experience, you need to know the data you are working with. This means understanding the properties of the objects you are collecting and how they relate to each other. If you don't know your data, you will struggle to create meaningful reports.

The data should also be predictable and consistent. If you are gathering data from multiple sources, ensure that the data is in a similar format or structure. I haven't gotten to any code yet, but we're talking about an automated process to create a report. It is much easier to script when know what to expect from the data.

Identify the data

Part of the planning process is to identify the data you need for your reports. I'm assuming you want the report generation process to be quick and efficient. Limiting the report data to only what you need will streamline the report generation process. While PowerShell will happily create HTML reports just about anything, you want to make report useful, relevant, and easy to read.

ConvertTo-HTML

The overall workflow for creating HTML reports in PowerShell is to gather the date, convert it to HTML using the ConvertTo-Html cmdlet, and then save the HTML to a file. You can then decided what to do with the file. ConvertTo-Html has been around for a long time. The version in PowerShell 7 has more features and options than the one in Windows PowerShell so if you haven't used it much in PowerShell 7, you will want to read the help documentation.

Expect Scripting

The last reporting basic is that you should expect to write scripts. I'm sure you could create a simple HTML report with a few PowerShell expressions. However, expect that you will need to write scripts. Maybe even several scripts and functions. You will need code to gather the data, code to process it as HTML and code to finalize or format the reports.

Basic Workflow

Let's begin with a few basic commands. These examples are the foundation of the scripting work you will need for your reports.

Get-Service win* | ConvertTo-Html

This is as basic as it gets. Get some information and convert it to HTML.

Converting to HTML
figure 1

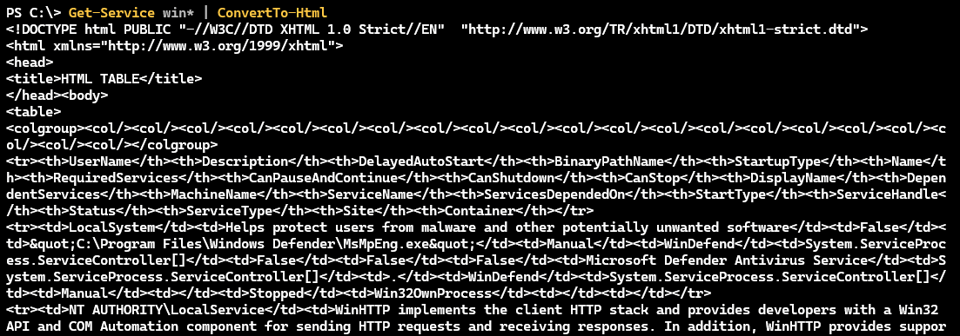
The ConvertTo-Html cmdlet does exactly what the name implies. It converts the objects passed to it into HTML. The output is a string that contains the HTML markup. You can save that string to a file or use it in other ways.

$file = Join-Path -path $env:temp -childpath "winsvc.html"
Get-Service win* | ConvertTo-Html | Out-File -filepath $file

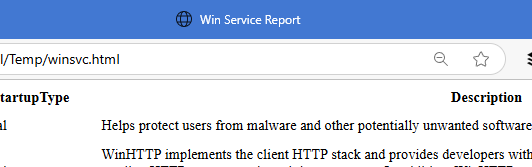
The HTML output is very basic.

Raw HTML
figure 2

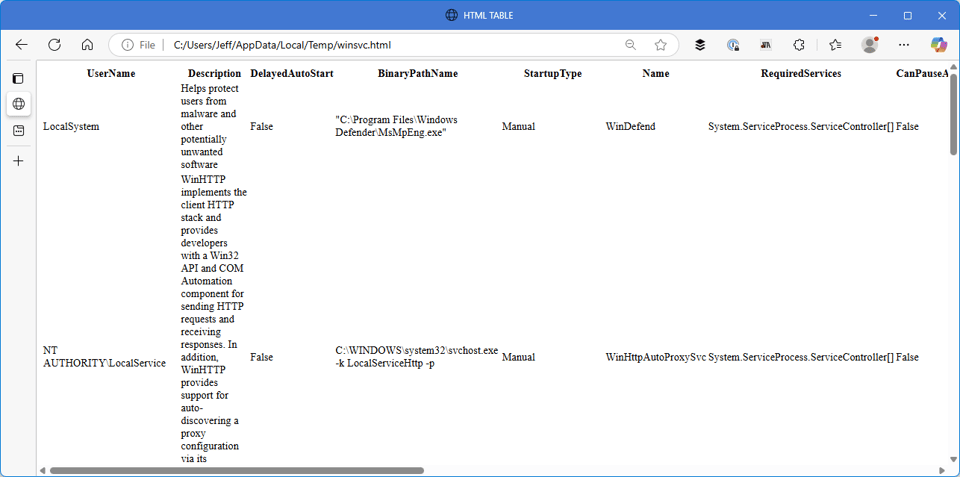
This may not be what you expected. ConvertTo-Html converts the entire object to an HTML table. This means some properties won't render well in HTML. Remember I mentioned that you need to know your data and know what you want in your reports? This is why. You need to be selective.

Get-Service win* | Select-Object Name,Status,DisplayName,StartUpType,Description |
ConvertTo-Html | Out-File -filepath $file
Selected output converted to HTML
figure 3

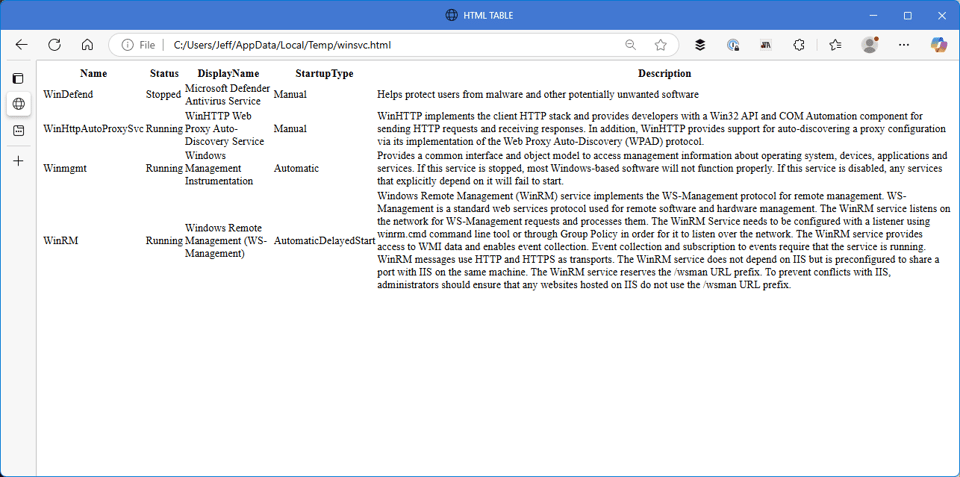
This isn't especially pretty, but it is much more useful. The HTML table now contains only the properties we selected. With a little scripting and formatting, you can improve upon this.

Adding a Title

For example, instead of a title of "HTML TABLE", define one.

Get-Service win* | Select-Object Name,Status,DisplayName,StartUpType,Description |
ConvertTo-Html -title "Win Service Report" | Out-File -filepath $file
Adding a report title
figure 4

Adding Other Content

You can also add content before the table and after. You can insert any HTML content you want.

$pre = @"
<h1>Win* Service Report</h1>
<h2>$($env:Computername)</h2>
"@

$post = "<h5><i>Report run $(Get-Date)</i></h5>"

Get-Service win* | Select-Object Name,Status,DisplayName,StartUpType,Description |
ConvertTo-Html -title "Win Service Report" -PreContent $pre -PostContent $post |
Out-File -filepath $file

Look at what just these few lines of code can produce.

Win Service Report
figure 5

I encourage you to keep things simple at first. If you feel you don't know enough about HTML, spend a little time at https://www.w3schools.com/html/html_intro.asp. I like the interactive examples.

Adding Style

To add style and color to your HTML reports, you will need to rely on Cascading Style Sheets (CSS). CSS is a language used to describe the presentation of HTML documents. It allows you to control the layout, colors, fonts, and other visual aspects of your HTML content. Don't worry, you can do as I did and "borrow" CSS styles from existing sources. I'll even share some with you in a moment.

The CSS file is a separate file that you link to in your HTML. You can create your own CSS file or use an existing one. The CSS file should be saved with a .css extension. It can reside anywhere you want, but you will need to specify the path to the file when you create your HTML report.

Here is a sample CSS file. If you are new to CSS, I recommend editing the CSS file in VS Code. You will get syntax highlighting and other features that will make it easier to work with. My other tip is to remember that each CSS entry ends with a semicolon. If you forget the semicolon, the CSS will not work as expected. I've spent my share of time trying to figure out why my CSS wasn't working only to discover I forgot a semicolon.

@charset "UTF-8";

table {
    font-family: "Trebuchet MS", Arial, Helvetica, sans-serif;
    border-collapse: collapse;
}
td {
    font-size: 1em;
    border: 1px solid #98bf21;
    padding: 5px 5px 5px 5px;
}
th {
    font-size: 1.1em;
    text-align: center;
    padding-top: 5px;
    padding-bottom: 5px;
    padding-right: 7px;
    padding-left: 7px;
    background-color: #A7C942;
    color: #ffffff;
}
pre {
    background-color: #1e90ff;
    border-radius: 0 0.25rem 0.25rem 0;
    overflow-x: auto;
    padding: 1em;
    font-size: 14px;
    line-height: 20px;
}
name tr {
    color: #000000;
    background-color: #EAF2D3;
}

For testing purposes you can use a local file. Depending on how your report will be consumed, you might want to use an internal web server to host the file. Later, I'll demonstrate how to make your HTML report be self-contained.

For now, I'll update my example and specify the path to the CSS file.

$pre = @"
<h1>Win* Service Report</h1>
<h2>$($env:Computername)</h2>
"@
$post = "<h5><i>Report run $(Get-Date)</i></h5>"
$splat = @{
    PreContent  = $pre
    PostContent = $post
    Title       = 'Win Service Report'
    CssUri      = 'C:\scripts\samplecss\sample.css' # <-- local path to the style sheet
}
Get-Service win* | Select-Object Name,Status,DisplayName,StartUpType,Description |
ConvertTo-Html @splat |
Out-File -filepath $file
Formatted and Styled with CSS
figure 6

What a difference a little CSS makes! The report is now much more visually appealing and easier to read. You can customize the CSS to fit your needs and preferences.

Embedding Style

If you use a CSS file, it needs to be accessible to anyone viewing the report. An alternative is to embed the CSS directly in the HTML report. This makes the report self-contained and eliminates the need for an external CSS file.

Take the contents of the CSS file and paste them between <style> tags in the HTML header. If you use a header and want a title, you'll need to include the title here. The Title parameter will not be processed if you use a header.

$title = "Win Service Report"
$head = @"
<Title>$title</Title>
<style>
body { background-color:#FFFFFF;
     font-family:Tahoma;
     font-size:10pt; }
td, th { border:1px solid black;
     border-collapse:collapse; }
th { color:white;
     background-color:black; }
table, tr, td, th { padding: 2px; margin: 0px }
tr:nth-child(odd) {background-color: LightGray}
table { width:95%;margin-left:5px; margin-bottom:20px;}
</style>
"@

Use this header in the ConvertTo-Html command.

$splat = @{
    PreContent  = $pre
    PostContent = $post
    Head        = $head
}
Get-Service win* |
Select-Object Name,Status,DisplayName,StartUpType,Description |
ConvertTo-Html @splat |
Out-File -filepath $file
Embedded Style
figure 7

This style sheet creates alternating row colors which you might like for a larger table.

Summary

This is a good spot to stop for now. I've laid the groundwork for your scripting projects and hopefully demonstrated the basics of using ConvertTo-Html. Next time, I'll demonstrate some advanced HTML reporting techniques. In the mean time, if you want to experiment with CSS, download my sample repository at https://github.com/jdhitsolutions/SampleCSS.

(c) 2022-2025 JDH Information Technology Solutions, Inc. - all rights reserved
Don't miss what's next. Subscribe to Behind the PowerShell Pipeline:
Start the conversation:
GitHub Bluesky LinkedIn About Jeff
Powered by Buttondown, the easiest way to start and grow your newsletter.