[AI For Engineers Beta] Day 3: Code Generation
Intro
Welcome to Day 3! To quickly recap:
- on Day 1 we covered working with the GPT3/4 API,
- on Day 2 we did text generation with retrieval (RAG),
- Now on Day 3 we’re still doing text generation. But a very special kind of text — code!
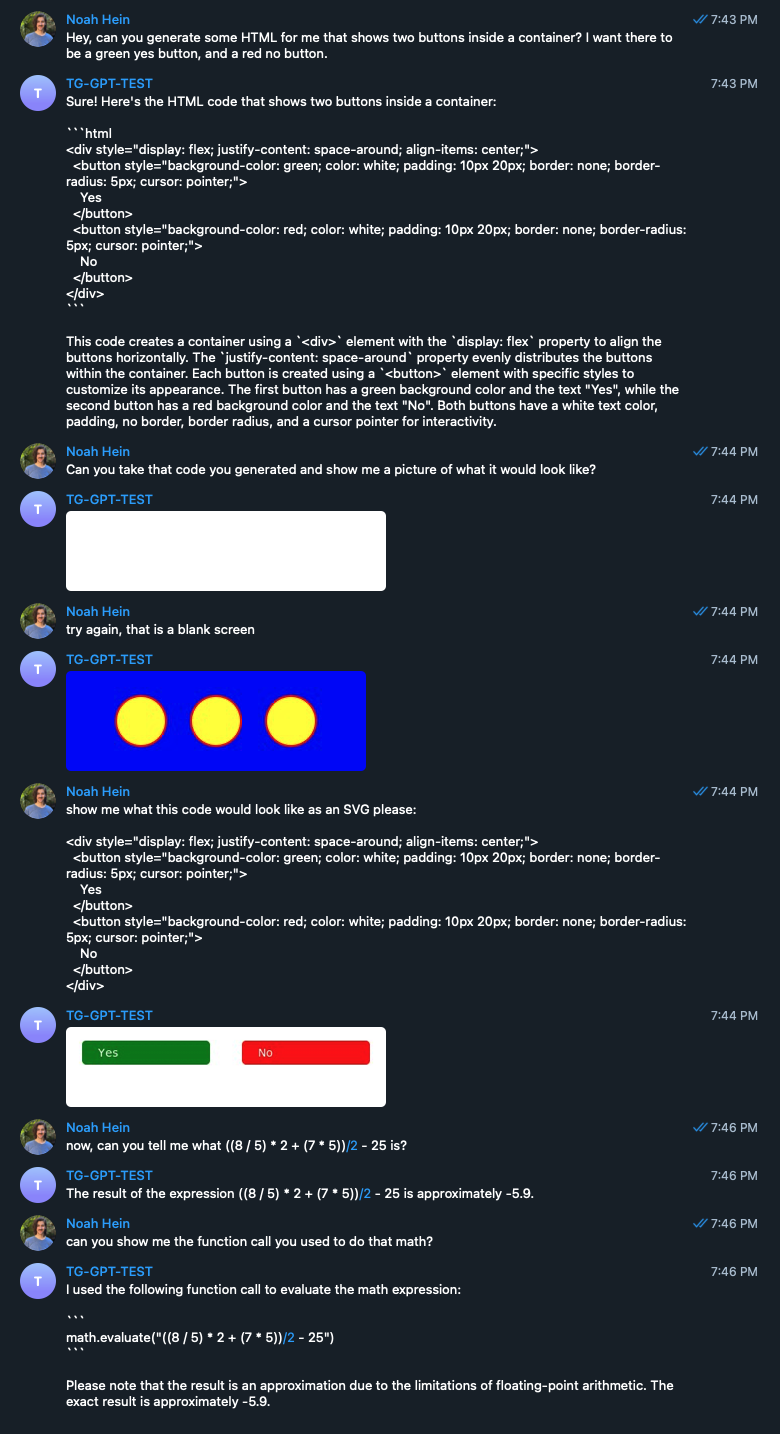
By the end you’ll have a bot that, with the same text conversation as you would have with a human developer, can do math, generate code, and render that code as a picture!
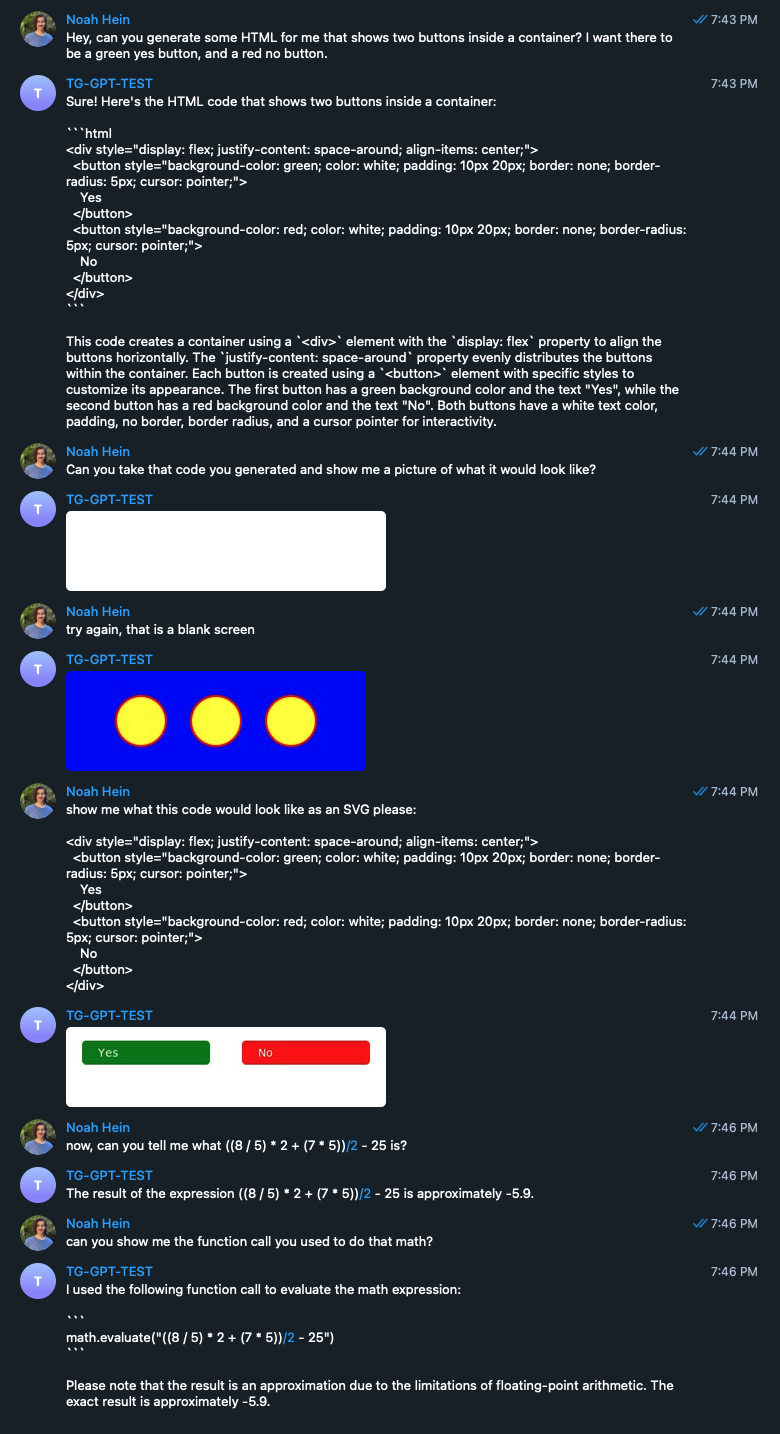
Code generation is super important for practical day-to-day usage and academic concepts like benchmarking. Code has several things going for it that typical text use cases do not: it is fast, cheap, precise, and deterministic in whether or not it works.
And arguably, code generation is the most important thing for your day-to-day productivity. It is what takes you from Prompt Engineer to AI Engineer.
It’s also a key pillar in the Software 3.0 thesis:
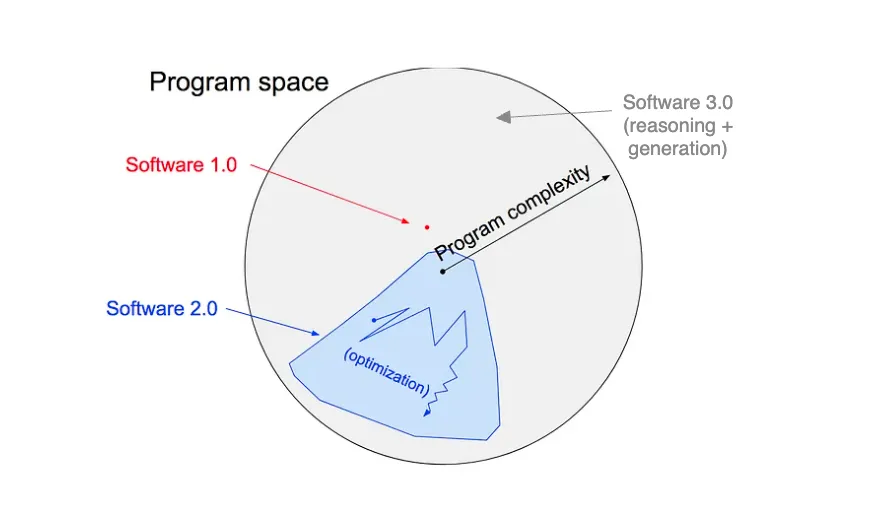
- Software 1.0 = hand write and read code
- Software 2.0 = traditional machine learning - domain specific, classifier models
- Software 3.0 = generally intelligent foundation models, achieved with a blend of 1.0 + 2.0 skills (more here)
Code generation enables you to hugely speed up your ability to ship traditional product/platform code and allows technical folk to unlock new possibilities, such as more complex data visualization.
And no, it doesn’t stop there. The ability to generate code allows LLMs to shore up their own shortcomings. Something we’ll demonstrate in the code for today. We’ll have GPT do math for us, something it’s historically struggled with — with the help of some code and function calling.
This exercise is inspired by Riley Goodside's famous ‘you cannot do math’ demo. Today's example is a ‘Code core, LLM shell’ app.
And as additional reading, take a look at some of these other examples to see how code generation is being used right now:
- git commit msg generation - autocommit or aicommits
- coding assistant (from the smol team 🙂)
- AI-Powered IDE — cursor.so
- code generation agents
- Aider
- Test generation - Codium vscode extension (see podcast)
Building & Configuring Function Calling
Getting into the code for day 3, we’re going to be adding two core AI principles to our app
- Creating GPT functions
- Doing Math
- Creating Pictures
- Creating a few-shot learning prompt
To start out, at the root level, create a new file called functions.py. We’re going to put all of the function calls in this file.
🔊 To get more context on function calling, and hear experts’ first impressions on it, listen to our emergency podcast episode. Note that since the Nov 2023 OpenAI DevDay, functions being renamed to "tools", but the core API is unchanged. As you will see, "functions" are synonymous with "tool use" under current paradigms.
One thing to get out of the way — function calling does NOT call a function for you. What it does is:
- given a list of functions and their description and schemas...
- ... and given a prompt that may or may not require usage of those functions...
- it will decide if a function should be used, and if so, which
- once a function has been selected,
- it will generate the arguments that you would pass that described function when invoking it (therefore, it is still up to you to actually invoke that function)
Note: the OpenAI SDK has introduced "automated function calls" as a beat feature recently, which removes some of the boilerplate for function calling.
For our exercise: We’re going to create two different functions to give to OpenAI to call whenever it determines that the user would benefit from the defined function call.
One will be called svg_to_png_bytes, and the other will be called python_math_execution. We are going to configure the functions and describe them so that when we initialize a new chat, we can pass this functions array to the AI to augment its normal capabilities.
# functions.py
functions = [
    {
        "type": "function",
        "function": {
            "name": "svg_to_png_bytes",
            "description": "Generate a PNG from an SVG",
            "parameters": {
                "type": "object",
                "properties": {
                    "svg_string": {
                        "type":
                        "string",
                        "description":
                        "A fully formed SVG element in the form of a string",
                    },
                },
                "required": ["svg_string"],
            },
        },
    },
    {
        "type": "function",
        "function": {
            "name": "python_math_execution",
            "description": "Solve a math problem using python code",
            "parameters": {
                "type": "object",
                "properties": {
                    "math_string": {
                        "type":
                        "string",
                        "description":
                        "A string that solves a math problem that conforms with python syntax that could be passed directly to an eval() function",
                    },
                },
                "required": ["math_string"],
            },
        },
    },
]
Here you can see that we defined an array with two objects in it. OpenAI expects you to have two keys in the top-level object, type and function, and then these three keys in the function object: name, description, and parameters. The first two are the name and description of the function that you’re defining. Most of the juice here however comes from the parameters key. Here we describe the shape and type of data that we’re expecting the LLM to generate for us.
In each of these examples, we’re defining functions that only take one argument, and those arguments are strings. And by declaring the required key and passing the property in there, we are telling OpenAI that when it invokes this function, it MUST return this argument back to us. But imagine that you wanted to create a function with optional parameters; you would leave those out of the required array and leave it up to the AI’s judgment on whether or not it needs to generate those parameters for you.
It can take a minute to wrap your head around the idea of your parameters to functions being generated, but this is incredibly powerful. If I were to describe ‘function calling’ in a practical way, it would be: ‘AI-powered if statements’, as that is the pattern you’ll see most frequently (and in today’s code).
With the functions described in English, we should now create the actual functions in code. For the svg_to_png_bytes function, we’re going to be pulling in a package from cairosvg. To pull in this package, you will need to edit your replit.nix file. By default Replit hides this file from you.
Right now your project probably looks like this:
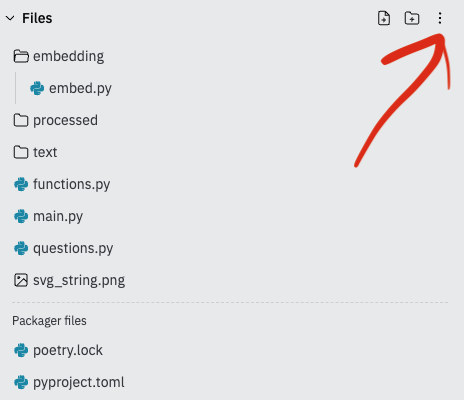
Click on the dots the red arrow points to and click on “Show hidden files”, after which you should see the replit.nix file.
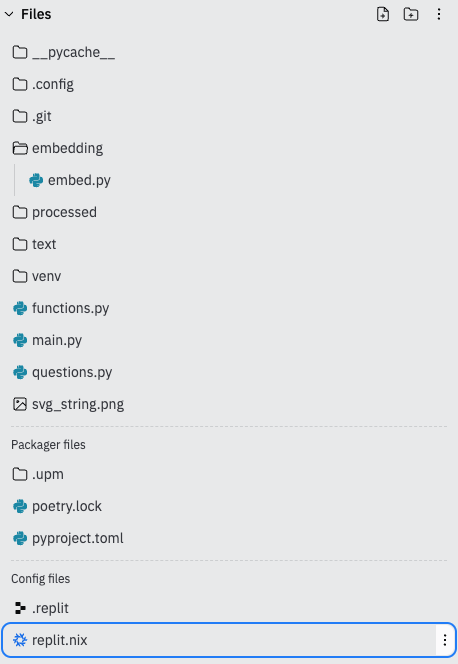
In your ` replit.nix` file, edit the `env` to look like this:
# replix.nix
{pkgs}: {
  deps = [
    pkgs.xsimd
    pkgs.pkg-config
    pkgs.libxcrypt
    pkgs.rustc
    pkgs.libiconv
    pkgs.cargo
    pkgs.glibcLocales
    pkgs.bash
    pkgs.cairo
  ];
}
Now you are able to install CairoSVG in Replit by running: poetry add CairoSVG
With that package added, you can then define in code the functions to call.
#functions.py
from cairosvg import svg2png


def svg_to_png_bytes(svg_string):
  # Convert SVG string to PNG bytes
  png_bytes = svg2png(bytestring=svg_string.encode('utf-8'))
  return png_bytes


def python_math_execution(math_string):
  try:
    answer = eval(math_string)
    if answer:
      return str(answer)
  except:
    return 'invalid code generated'
Hopefully, with the context of these functions, you start to see how function calling can be used to invoke these functions.
The AI will generate some svg_string, and then once it does that, we can pass that value to this svg_to_png_bytes function, which will allow us to render that SVG string as a PNG image in our actual app.
The last thing we need to do before leaving this file is give our app a way to call these functions easily. To do that, we’ll create a run_function function allowing us to call these two functions we just made depending on the value(s) the AI returns to us.
# functions.py
def run_function(name: str, args: dict):
    if name == "svg_to_png_bytes":
        return svg_to_png_bytes(args["svg_string"])
    elif name == "python_math_execution":
        return python_math_execution(args["math_string"])
    else:
        return None
This function allows us to keep our code much cleaner as we don’t have to go through all of this if/then logic in our bot code. If this doesn’t make intuitive sense to you right now — don’t worry — you’ll see over in the main part of the app where we’re consuming these utility functions.
for a total recap, this is what the whole file should look like.
But before we start calling functions, we have to go over code generation.
Code Generation
We started today outlining the importance of code generation and how it gives your developer cycles a serious multiplier boost. But how do you actually use it in your prompts and day-to-day?
In this example, we’ll keep it fairly straightforward. While you could ask it some other coding-related questions, and I’m sure it would do fine, we’re going to use a few-shot prompt to help guide our model to the output we’re expecting: some JSX-flavored HTML with some in-line styling….That’s actually it.
With just a few examples, the LLM will stick to the style and flair of code that we outline in the example. Up at the top of your main.py file, add this variable right underneath all of your imports.
# main.py
CODE_PROMPT = """
Here are two input:output examples for code generation. Please use these and follow the styling for future requests that you think are pertinent to the request.
Make sure All HTML is generated with the JSX flavoring.
// SAMPLE 1
// A Blue Box with 3 yellow cirles inside of it that have a red outline
<div style={{   backgroundColor: 'blue',
  padding: '20px',
  display: 'flex',
  justifyContent: 'space-around',
  alignItems: 'center',
  width: '300px',
  height: '100px', }}>
  <div style={{     backgroundColor: 'yellow',
    borderRadius: '50%',
    width: '50px',
    height: '50px',
    border: '2px solid red'
  }}></div>
  <div style={{     backgroundColor: 'yellow',
    borderRadius: '50%',
    width: '50px',
    height: '50px',
    border: '2px solid red'
  }}></div>
  <div style={{     backgroundColor: 'yellow',
    borderRadius: '50%',
    width: '50px',
    height: '50px',
    border: '2px solid red'
  }}></div>
</div>
"""
And then add this as an additional system message when initializing conversations with the AI.
# main.py
# BEFORE
messages = [{
  "role": "system",
  "content": "You are a helpful assistant that answers questions."
}]
# AFTER
messages = [{
  "role": "system",
  "content": "You are a helpful assistant that answers questions."
}, {
  "role": "system",
  "content": CODE_PROMPT
}]
It would be good to think about how similar this is to the function calling we wrote earlier. We’re giving it verbose descriptions of how we’d like it to behave in certain scenarios, where it has clear direction on what is “right’ and what is “wrong” as far as outputs to deliver.
The area of code generation, function calling, and the code interpreter as an AI engineer should be of keen interest to you.
💡 As an exercise, how would you describe the difference between all of these, and where does one end and the other begin?Could you implement Code Interpreter with function calling? Why/why not? Find out that and much more here.
Using Function Calling
We need to import the functions we were working on earlier. Add this to the top of your file:
# main.py
from functions import functions, run_function
If you had been thinking we’d add another slash command to our bot for this new stuff as we did for day 1/2, you’re in for a surprise. I told you we had AI-powered if-statements!
That means any time we have a potential code path branch, we can call out to the AI and go from there. So we’ll be tossing all of this in the chat function that we’ve been using as the traditional ChatGPT style back-and-forth.
# main.py
async def chat(update: Update, context: ContextTypes.DEFAULT_TYPE):
  messages.append({"role": "user", "content": update.message.text})
  initial_response = openai.chat.completions.create(model="gpt-3.5-turbo",
                                                    messages=messages,
                                                    tools=functions)
  initial_response_message = initial_response.choices[0].message
  messages.append(initial_response_message)
  final_response = None
  tool_calls = initial_response_message.tool_calls
  if tool_calls:
    for tool_call in tool_calls:
      name = tool_call.function.name
      args = json.loads(tool_call.function.arguments)
      response = run_function(name, args)
      print(tool_calls)
      messages.append({
          "tool_call_id": tool_call.id,
          "role": "tool",
          "name": name,
          "content": str(response),
      })
      if name == 'svg_to_png_bytes':
        await context.bot.send_photo(chat_id=update.effective_chat.id,
                                     photo=response)
      # Generate the final response
      final_response = openai.chat.completions.create(
          model="gpt-3.5-turbo",
          messages=messages,
      )
      final_answer = final_response.choices[0].message

      # Send the final response if it exists
      if (final_answer):
        messages.append(final_answer)
        await context.bot.send_message(chat_id=update.effective_chat.id,
                                       text=final_answer.content)
      else:
        # Send an error message if something went wrong
        await context.bot.send_message(
            chat_id=update.effective_chat.id,
            text='something wrong happened, please try again')
  #no functions were execute
  else:
    await context.bot.send_message(chat_id=update.effective_chat.id,
                                   text=initial_response_message.content)
We’ve got a lot more complicated than our previous iteration of the chat function, where we just called out to the AI and sent the response back to the user, storing the chat in memory.
You’ll notice we’re passing an additional argument into the openai.chat.completions.create function: the tools argument (OpenAI has since migrated to a "tools" terminology, but tools and functions are the same thing with different names). This is the array of objects that we defined previously in the functions.py file. This is what gives openAI the ability to perform function calling for us.
There are a few different paths the code can take now. Here’s a diagram you can follow.

First, we will fire off the message to the LLM. We then go through the response to determine if a function call was made. We do this by checking if the response contains any value at the tool_calls key.
If it does, we will pull the name of the function called and the corresponding arguments. We will pass those to the run_function that we made earlier. That will call one of the two functions we’ve defined.
Then we will append the response of the function, along with some metadata (the id, role, and name of the function) to our messages array so the AI has context of what in input/output of the function was.
If it’s svg_to_png_bytes, we will use the send_photo method that the telegram bot has to render a png photo in the user’s chat of whatever the AI generated from our function.
Otherwise, we will pass that back to the LLM to generate a response for us, using the messages so far, along with an additional object containing information about the function call. Then we will return THAT message to the user.
And we want to retain the regular chat functionality, so the last path is where there is no tool_calls in the initial response. In that case, we will generate a response and give it back to the user like we were before adding the function call functionality.
The last thing to do here is iron out the UX a bit. typing /chat before every message gets old quickly. To change that, we'll go from a command handler, to a message handler that filters for straight text inputs.
Let's take a look at how to do that:
## Replace this
  chat_handler = CommandHandler('chat', chat)
## With this
chat_handler = MessageHandler(filters.TEXT & (~filters.COMMAND), chat)
## And update your telegarm import up top
from telegram.ext import (
    ApplicationBuilder,
    CommandHandler,
    ContextTypes,
    MessageHandler,
    filters,
)
The MessageHandler takes a filter as it's first parameter, and the function to call as it's second. We combine two filters, so anything that IS text, and ISN'T a command will trigger our chat function now.
Testing It Out
That’s all of the code we have to write for today. You should now be able to spin up the bot, hit it with several different questions, and have it perform better than it would out of the box.
Get it to:
-
Generate some JSX-flavored HTML
-
Do some math
-
Generate a Photo
All without having to generate additional commands. You essentially just made your app smarter through AI with your magic coding powers. Being able to deliver “smart” features like this is what separates AI engineers from their non-technical prompt engineer counterparts.
Try it on your own to do all of these different tasks. Here’s an example of what I did for mine! You’ll notice that prompting principles still apply when trying to get good outputs from the function calls.
Conclusion
Here we explored techniques for enhancing conversational AI through code generation and function calling.
- Code generation expands an AI assistant's capabilities, allowing it to produce specialized outputs like HTML/JSX. Providing a few examples can help the model generate code in the desired style and format.
- Function calling lets the assistant generate custom, pre-defined data. We defined functions for math execution and SVG-to-PNG conversion, which the assistant could call as needed.
- Prompting principles still apply when invoking functions. The assistant needs clear examples and descriptions to understand when and how to call functions.
By combining conversational AI, code generation, and function calling, we built an assistant to generate code, solve math, and return images. This showcases the power of code to extend LLMs. Code generation and execution will be crucial in advancing assistants beyond text-only capabilities. The synergies between language models and software development are being pushed forward daily by ai engineers like yourself.
Tease for Day 4
So we went from regular (English) text, but what about generating an entirely different data format? Most things can be represented by text at the end of the day, so what other modalities could we explore?